


Digitizing Black and White Negatives with a Camera and Developing Them in Lightroom

Digitizing 35mm Black and White Negatives: A Simple Method Without a Scanner
Do you have 35mm black and white film (135 format) to digitize but no dedicated film scanner? There’s a simple, fast, and precise solution: photograph your negatives with a digital camera, then convert them into positive images directly in Lightroom, no Photoshop needed.
For a quick first look before digitizing, see also How to Preview Film Negatives with a Smartphone.
This workflow is based on stabilized reproduction using a film duplicator (JJC or Nikon ES-2 type), paired with a macro lens and uniform light source. It produces high-resolution RAW files, perfect for editing, archiving, or even large format printing. For medium or large format film, a flatbed scanner or compatible duplicator is still recommended.
Bringing your black and white negatives back to life also means reviving memories, reconnecting with film grain, and rediscovering the poetry of light. With modern mirrorless cameras like the Nikon Z8, it’s now possible to digitize your film archives yourself with a sharpness that consumer scanners often can’t match.
This guide walks you through every step to reproduce, invert, and enhance your 35mm black and white negatives. A complete, effective, and accessible method to recapture the emotion of analog in a 100% digital workflow.
Digitizing Black and White Negatives with a Camera
After testing and comparing the main methods in the article How to Scan Your Film Photos: Flatbed Scanner, Nikon Coolscan or Camera?, I focused this time on the specific case of 35mm black and white negatives. These films have variable densities and sometimes strong contrasts, requiring a different approach from color slides. Here's my process, from shoot to final positive file.
Gear Used
To get high-quality results, gear choice is essential. Here’s my setup for accurately reproducing negative details:
- Camera: Nikon Z8 shooting 14-bit RAW
- Lens: Nikkor Z MC 50mm f/2.8 or Sigma MACRO 105mm F2.8 EX DG OS HSM
- Duplicator: JJC FDA-K1 (compatible with 35mm film)
- Lighting: Yongnuo YN300 II LED panel (CRI > 95) with frosted diffuser
- Mount: Stable mini tripod with perfect camera-to-film alignment
The JJC duplicator keeps the film flat and perfectly parallel to the sensor, a must for consistent sharpness. The light source must be uniform, stable, and flicker-free. I use a LED panel with a diffuser placed at a suitable distance for even lighting across the negative.
Preparation and Capture
Before photographing your negatives, take time to carefully prepare your setup:
- Clean your film with a blower and anti-static brush to remove dust and fibers.
- Manually set the white balance by photographing an empty frame with just the diffuser. This prevents color casts during inversion.
- Use manual mode to fully control exposure. Aim for a slightly right-leaning histogram without clipping highlights, to preserve detail in dense areas.
- Set aperture to f/8 or f/11 for edge-to-edge sharpness without diffraction.
- Use ISO between 32 and 100 for a clean, detailed image.
- Shoot in RAW (NEF) for maximum post-processing flexibility.
- Use a timer or remote shutter release to prevent vibrations.
Each frame is captured individually, advancing the film manually in the duplicator. Capture is nearly instant, allowing you to digitize an entire roll in just a few minutes. The Z8’s sensor dynamic range captures every nuance, even subtle ones.
Conversion in Lightroom
Once imported into Lightroom Classic, the goal is to convert the negative into a faithful positive image.
1. Open the Tone Curve
In the Develop module, scroll to the "Tone Curve" panel. By default, it’s in "parametric" mode, with sliders (highlights, shadows, etc.).
Click the bottom right icon of the graph to switch to Point Curve mode. You’ll now see a diagonal line.
To invert the negative:
- Drag the bottom left point (black) all the way up, it becomes white.
- Drag the top right point (white) all the way down, it becomes black.
Invert the negative using the Point Curve mode:
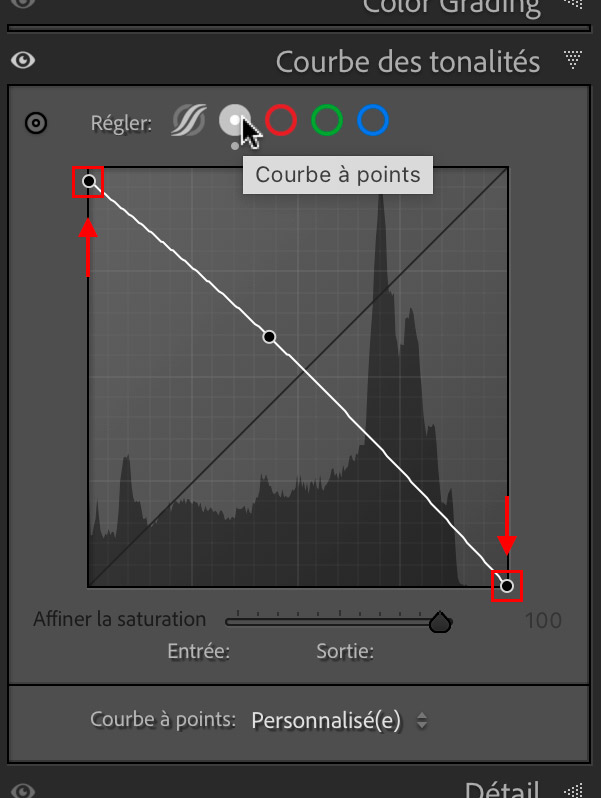
Your image is now positive. However, the contrast is inverted and needs correction.
2. Adjust Brightness and Contrast
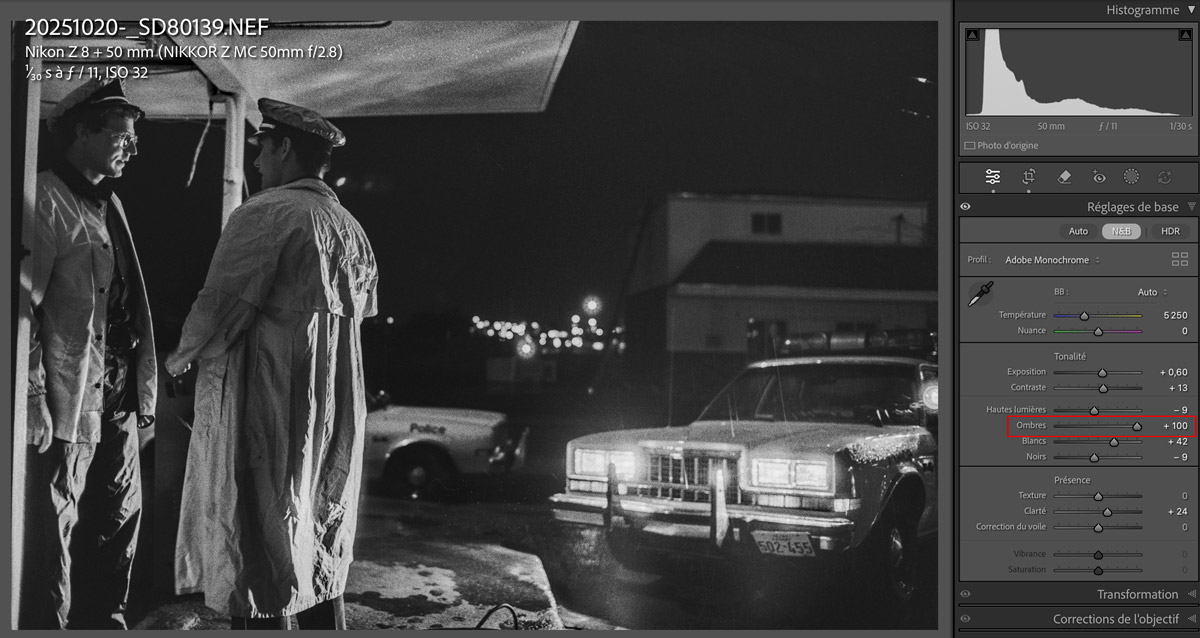
Important: after inversion, the basic sliders in Lightroom still affect the same tone ranges (highlights, shadows...), but those ranges are now reversed in your image.
In practice:
- The “Shadows” slider, normally used to brighten dark areas, now affects the highlight areas of the negative, meaning it will darken the light areas of the positive.
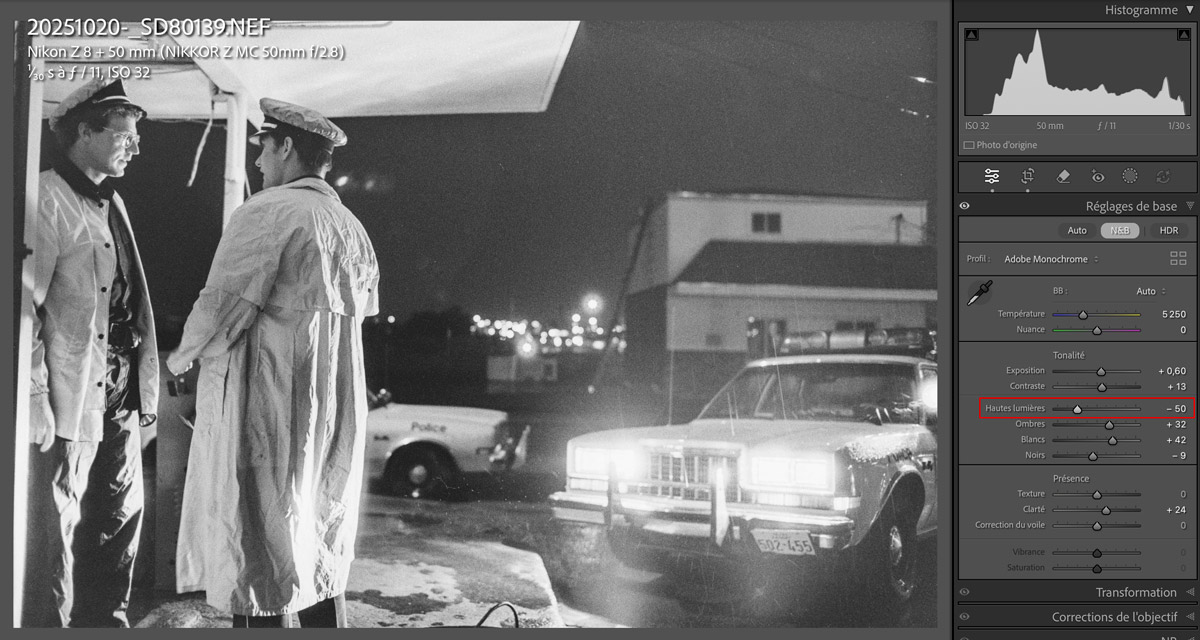
- The “Highlights” slider, usually reducing blown-out areas, will now lighten the dark parts of the positive (which were highlights in the negative).
This can be confusing at first. The best approach is to watch the visual effect of each slider on screen and make small tweaks. The following examples show how it works:
Example 1: Shadows at +100 darkens highlights
Example 2: Highlights at -51 brightens shadows
- Adjust exposure carefully: after inversion, the slider works in reverse. If the image looks too bright, increase the exposure slightly (e.g., +0.5 to +1) to darken it. If it looks too dark, reduce exposure to brighten it. Always judge by eye, not slider names.
- Lower contrast if the image looks harsh or crushed. Inversion can exaggerate tonal shifts. Reducing contrast can help restore smoother transitions.
- Use "Whites" and "Blacks" cautiously: their effects are also reversed. "Blacks" affects bright areas, "Whites" dark areas. Make small adjustments, always guided by what you see.
3. Finishing and Cleaning
- Use the Spot Removal tool to clean visible dust.
- Add Texture (+10 to +20) and Clarity (+5 to +15) to bring out film grain.
- If some areas are too harsh (faces, skies), reduce Clarity locally using a mask.
4. Save a Preset
Once happy with the result, click "Create Preset" to save your settings. Name it “B&W Inversion - 35mm Negative” so you can apply it to future files.
Tips for an Authentic Film Look
- In the Calibration panel, apply a Monochrome or Camera Neutral profile to match your film look.
- Add a subtle warm tint (in midtones via Color Grading) to emulate a fiber-based print tone.
- For more character, simulate selenium or sepia toning with subtle color shifts in the shadows.
- Avoid fake grain filters: the natural grain in your image is enough to recreate the film feel.
 Dallas Police 1987 - Photo : © Sebastien Desnoulez
Conclusion
Digitizing black and white negatives with a digital camera is now an accessible, fast, and impressively high-quality method.
Though this article references the Nikon Z8, you’ll get similar results with most modern mirrorless cameras, especially those with 24MP or higher. At low ISO (32 to 100), these sensors resolve more detail than most 35mm films, as shown in this comparison between digital sensors and film. I mention the Z8 simply because that’s what I used for all my scans.
The Nikon Z8 + JJC FDA-K1 combo brings out the full sharpness of 35mm film, surpassing most consumer-grade scanners in resolution and flexibility.
Once mastered, inversion in Lightroom becomes a powerful tool to re-develop your images with your own creative vision. It offers a modern reinterpretation of your archives without betraying the spirit of film photography.
This scanning method was used to restore the black and white negatives from my 1987 photo report in Dallas, documenting NorthWest Dallas police patrols. It helped recover the full graphic impact of those historical images shot on Ilford HP5 and Fujichrome film.
Note: this article is not sponsored. It reflects my personal experience, based on real-world tests with the Nikon Z8 and Ilford HP5 and Kodak Tri-X black and white films.
About the Author
Sebastien Desnoulez is a professional photographer specializing in architecture, landscape and travel photography. Trained in photography since the 1980s, he covered Formula 1 races and reported from around the globe before devoting himself to a more demanding fine art photography practice blending composition, light, and emotion. He shares his technical expertise through hands-on articles for passionate photographers, built on a solid background in film and digital photography.
All the photos displayed on this website are copyright protected © Sebastien Desnoulez. No use allowed without written authorization.
Legal notices
Tags


