


How to Scan Your Film Photos: Flatbed Scanner, Nikon Coolscan or Camera?

Which method should you choose to digitize your slides, negatives, and film archives?
Recently, I sorted through four boxes of slides and selected around 400–500 photos. Some will be published on this blog, while others (around 5%) may be printed in large format. To digitize them, I compared three options: flatbed scanner from Epson, Nikon Coolscan scanner, and camera-based reproduction.
Option 1: Epson Perfection 4990 Flatbed Scanner with VueScan
 Epson Perfection 4990
I bought this flatbed scanner around 2005 to scan medium format film (120) shot with a Holga. Its high resolution was a plus for 35mm film (135), which I never got around to scanning. To get it working again, I purchased VueScan for more precise settings, since the Epson driver is no longer updated for recent macOS versions.
Tip: you can download a trial version of VueScan by registering on the website. Wait for the follow-up email with the 25% discount before buying.
Pros:
- ICE technology for dust removal.
- Well-suited for 120 and 4x5" film formats.
Cons:
- Not sharp enough for 35mm, especially if slides curl, due to shallow depth of field and lack of a true lens.
- Images often lack micro-contrast and dynamic range, with a flat and slightly hazy look—especially with 35mm scans.
Option 2: Nikon Coolscan LS-40 / LS-50 / LS-4000 / LS-5000 with VueScan
 Nikon CoolScan V ED
As head of the digital transition at the DPPI photo agency in 1996, I used several Nikon Coolscan models (LS-2000, LS-4000, LS-5000 with SF-200 feeders) to scan our reportage images and archives before fully switching to digital with the Nikon D1, which offered better image quality at a lower cost than the Kodak DCS.
Pros:
- 4000 dpi optical resolution.
- Effective ICE technology.
- Reliable for professional use.
Cons:
- Only available second-hand, with widely varying condition.
- Risk of dusty sensors, smoke residue, or mechanical failure.
- High prices: €400–500 (LS-40/50) and €1000–1500 (LS-4000/5000).
Option 3: Camera Digitization with Slide/Film Duplicator (Nikon ES-2 or JJC FDA K-1)
 JJC FDA K 1
Context
Unconvinced by the Nikon ES-2 (rounded shape, limited compatibility), I tested and adopted an alternative: the JJC FDA K-1, paired with a Yongnuo YN300 II LED light.
To validate this setup before buying, I inserted a piece of kraft paper between the diffuser and the barn doors, taped a slide to the outside of the doors, and positioned the whole setup vertically facing my Nikon camera. I used a Sigma MACRO 105mm F2.8 EX DG OS HSM on a Nikon Z8 via the FTZ adapter and an extension tube, mounted on a mini tripod. The goal was to assess sharpness and determine whether the setup allowed for large-format prints.

DIY
If you're on a budget or enjoy building your own gear, this approach can replace the Nikon ES-2 or JJC FDA K-1—as long as you:
- Build a mask to block stray light and hold the slide securely for fast, repeatable placement.
- Use a texture-free diffuser like frosted plexiglass. During my test, shooting at f/8 then f/11 revealed the kraft paper texture in the background.
- Build a support system to ensure sensor-to-slide alignment and parallelism.
Testing the JJC FDA K-1
I ordered the JJC kit with a frosted plexi diffuser but without the backlight module.

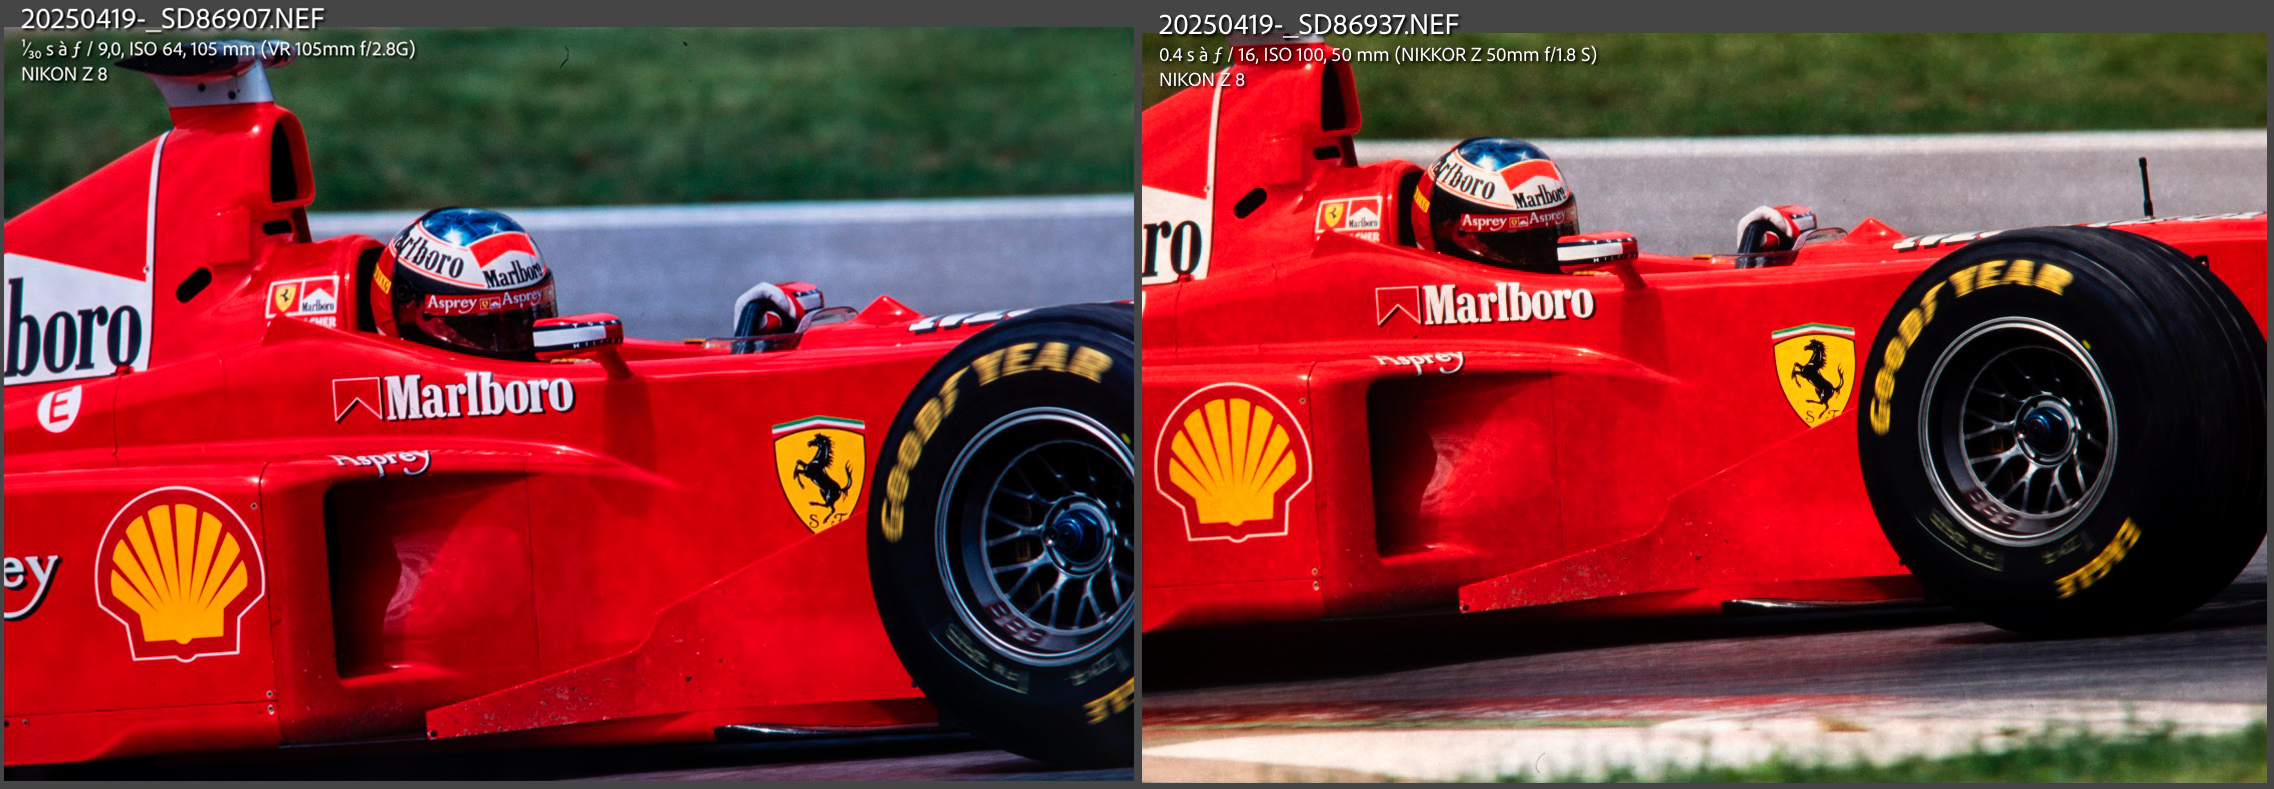
The results were convincing, as shown by this image of Michael Schumacher on Ferrari at the 1998 Austrian Grand Prix, cropped to panorama in Lightroom. All the photos in the article F1 with Brad Pitt: Relive 1990s Formula 1 in Photographs were digitized using a Nikon Z8, a 50mm f/1.8 S lens, extension tubes, and a JJC film holder.
Pros:
- Native resolution of 45 MP (Nikon Z8, Z9 or Z7 II), exceptional detail.
- Very fast capture (< 1 s).
- RAW files with excellent editing flexibility.
- Great cropping potential.
- Even lighting thanks to the frosted diffuser.
- Solid aluminum tube build.
Cons:
- No ICE: slides must be manually cleaned, with dust spots removed in Lightroom or Photoshop.
- EXIF metadata reflect the digital camera, not the original photo’s exposure or date.
Warnings:
- Extension tubes are required depending on your lens. Use ones with electronic contacts. I tried Viltrox and Meike tubes for Z-mount—Meike has better quality.
- At 100% in Lightroom, the image may look soft due to the sensor’s resolution (8200 × 5500 px ≈ 5800 dpi), which exceeds the film’s optical resolution (about 2500 dpi for Fujifilm RDP 100 Provia). See also my film vs digital resolution comparison.
- Slide film (E6) has high contrast and low dynamic range, making adjustments tricky even with RAW. Color shifts can occur if processing was flawed or the film has aged poorly. Tint drifts (green/magenta, blue/yellow, cyan/red) may appear and be hard to correct, though Lightroom’s Color Grading tools help.
- Scanning black and white negative films comes with its own challenges, which I discuss in the article Scanning Black and White Negatives with a Camera and Developing Them in Lightroom.
Other digitization methods
Rotary drum scanners, once favored by prepress professionals in the 1990s, became somewhat more accessible in the early 2000s with the Hi-Scan Eurocore.
The DPPI lab (Magenta) purchased two of them around 1998. They offered superb quality but were costly and required regular maintenance. By 2007, finding spare parts was already difficult.
Slides were mounted on a plexiglass drum, secured with Rhodoid film and contact oil. The oil avoided Newton rings (interference patterns from glossy surfaces) but required careful cleaning after every scan.
This technology was gradually replaced by Imacon Flextight or professional flatbed scanners, which offer comparable quality without the need for wet mounting.
My advice: I don’t recommend buying a used drum scanner unless you work in a well-equipped lab with tech support available.
Conclusion
Among the three compared methods, camera-based reproduction proved the fastest, most flexible, and most cost-effective. If you already own a DSLR or mirrorless camera (24–45 MP) and a macro lens, the JJC FDA K-1 used with RAW shooting is an excellent option. For an investment of around €75 (+ LED light with CRI > 95), you can digitize your slides and negatives with high-quality results suitable for large prints.
Note: Be sure to thoroughly clean your film and both front/rear lens elements. At f/8 or f/11, even a front lens dust spot—though blurred—can still show up in the image.
Scanning time is extremely short, as the entire sensor is used in a single shot. However, dust removal and scratch correction must be done manually in Lightroom or Photoshop.
Flatbed scanners remain suitable for medium/large formats or occasional use if you already own one. Nikon Coolscan models deliver excellent 35mm quality, especially in series with automatic loaders—but buying and maintaining one is more demanding.
Summary of options:
- Flatbed scanner (with transparency adapter): best for low-res 35mm scanning or for medium/large formats.
- Nikon Coolscan scanners: ideal for high-quality 35mm film scanning. Use LS-4000/5000 with SF-200 loader for batch scans. LS-8000 and LS-9000 also support 120 film.
- Other brands like Plustek or Minolta (used) offer alternatives, though I haven’t tested them.
- Professional units like the Imacon Flextight deliver exceptional results but are very expensive.
- Camera-based digitization: perfect if you already have a compatible camera. Fast, flexible, and independent of proprietary software, this method lets you capture in RAW for optimal post-processing.
Practical Tips for Digitizing Slides and Negatives with a Digital Camera
If you simply want to identify what’s on your strips before scanning, see How to Preview Film Negatives with a Smartphone.
- Clean your film carefully using a blower and antistatic brush. Use microfiber only if the film is dust-free.
- Ensure your slides or negatives are flat to avoid edge softness.
- Use a uniform and stable light source with CRI > 95 for accurate color rendering.
- Shoot at f/8 to f/11 for maximum sharpness without compromising optical quality.
- Shoot in RAW for maximum post-processing flexibility, especially for white balance and highlight recovery.
- Use Lightroom or Photoshop for final editing: dust removal, scratch repair, and color corrections.
Note: This article is not sponsored. It contains no e-commerce links or product recommendations. My opinion is entirely personal.
About the Author
Sebastien Desnoulez is a professional photographer specializing in architecture, landscape and travel photography. Trained in photography in the mid-1980s, he covered Formula 1 races and reported from around the globe before devoting himself to a more demanding fine art photography practice blending composition, light and emotion. He also shares his technical expertise through hands-on articles for passionate photographers, built on a solid background in both film and digital photography.
FAQ – Scanning Slides and Film Negatives
What is the best method for scanning 35mm slides?
Using a digital camera with a film duplicator (like the JJC FDA K-1) is fast, precise, and flexible in RAW. This is the method I now prefer.
Is it worth investing in a Nikon Coolscan scanner?
Yes, if you want professional-quality results from 35mm film and benefit from ICE dust removal technology. However, these scanners are only available second-hand and can be costly to maintain.
Are flatbed scanners like Epson good enough?
Yes, for medium or large formats, or occasional use. But they lack sharpness and contrast for 35mm negatives.
Which lens should I use for digitizing slides?
A 50mm or 105mm macro lens is ideal. It must offer 1:1 magnification. Extension tubes can be used to reach this ratio if needed.
Can I scan film with a Nikon Z camera?
Absolutely. I personally use a Nikon Z8 with a JJC FDA K-1 and LED lighting, achieving excellent results. The high-resolution sensor captures fine detail suitable for large prints.
What lighting is best for scanning film?
A continuous LED light source with a high Color Rendering Index (CRI 95 or more) is recommended. It should be even and diffused with a proper light panel or diffuser.
Why do scanned images sometimes look soft at 100% zoom?
Digital sensors have much higher resolution than film. A well-scanned slide may only resolve 2500–3000 dpi, which can appear soft when zoomed in on a 45 MP file without appropriate sharpening.
How can I correct color casts from aged slides?
Use white balance and color grading tools in Lightroom or Photoshop. Some color shifts caused by aging or poor development can be partially recovered in post-processing.
How do I remove dust or scratches from scans?
Nikon scanners with ICE technology handle this automatically. With a digital camera setup, you’ll need to clean your film carefully and do manual retouching in Lightroom or Photoshop.
Tags


